CBC America Digimaster Series DVRs
|
Spec Sheets DR16NRT_1007.pdf Digimaster 16 Real Time, 1st Release February 2008 DR8-16_CS Digimaster 8 & 16 DR4N_CS07-07.pdf Digimaster 4 DR4Nold_CS.pdf Digimaster 4 (Pre 07/2007) |
||||||||||||||||||||||||||||||||||||||||||||||||||||||||||||||||||||||||||||||||||||||||||||||||||||||||||||||||||||||||||||||||||||||||||||||||||||||||||||||||||||||||||||||||||||||||||||||||||||||||||||||||||||||||||||||||||||||||||||||||||||||||||||||||||||||||||||||||||||||||||||||||||||||||||||||||||||||||||||||||||||||||||||||||||||||||||||||||||||
|
Manual DR16NRT Manual_CBC_English.pdf 07-14-2008 DR-SeriesManual.pdf DR-SeriesDVRBetaManual-Mouse.pdf DRXH-series manual_ENGLISH.pdf 07-26-2010 (8.3 MB) ** Use this DVR Setup Documentation Sheet for your records ** Ganz Digimaster DRxN Training Videos Note: DDNS now works through a router. |
||||||||||||||||||||||||||||||||||||||||||||||||||||||||||||||||||||||||||||||||||||||||||||||||||||||||||||||||||||||||||||||||||||||||||||||||||||||||||||||||||||||||||||||||||||||||||||||||||||||||||||||||||||||||||||||||||||||||||||||||||||||||||||||||||||||||||||||||||||||||||||||||||||||||||||||||||||||||||||||||||||||||||||||||||||||||||||||||||||
|
DMS Remote Access Software for Digimasters and PixepPro IP cameras Beta DMS_0.5.1.11063001.zip 06-30-2011 (DRxHD, DRxHV, DRxN, & PixelPro IP Cameras) |
||||||||||||||||||||||||||||||||||||||||||||||||||||||||||||||||||||||||||||||||||||||||||||||||||||||||||||||||||||||||||||||||||||||||||||||||||||||||||||||||||||||||||||||||||||||||||||||||||||||||||||||||||||||||||||||||||||||||||||||||||||||||||||||||||||||||||||||||||||||||||||||||||||||||||||||||||||||||||||||||||||||||||||||||||||||||||||||||||||
|
Remote Agent Software Current Version RemoteAgentu(64CH)u_20110412.zip 04-12-2011 (DRxN, DRxNRT, and DRxH for up to 4 DVR's / 64 Cameras) (Right-Click & select "Save Target As.." to save) Current DRxN Only series Version ragent_v3.20.2.16-32.0.0.0.zip 12-23-2009 (Windows XP, Vista, & 7) for up to 4 DVRs and 64 Cameras max DRxN series Version Readme.txt Beta RemoteAgentu(64CH)u_20110117.zip 01-31-2011 (DRxN, DRxNRT, and DRxH for 64 Cameras) Beta RemoteAgentu(64CH)u_20101208.zip 12-08-2010 (DRxN, DRxNRT, and DRxH for 64 Cameras) Beta RemoteAgentu(64CH)u_20101129.zip 11-29-2010 (DRxN, DRxNRT, and DRxH for 64 Cameras) Beta RemoteAgentu(64CH)u_20101115.zip 11-15-2010 (DRxN, DRxNRT, and DRxH) This Beta may have intermittent connection issues. - For ease of managing software, save files to C:\Files\CBCA\Digimaster\RemoteAgent\ Create the folder if it doesn't exist. Previous Versions of Remote Agent Software: ragent_v3.17.2.15-32.0.0.0.zip 09-18-2009 Beta ragent_v3.15.1.12-32.0.0.0.zip 05-11-2009 Beta (Minimum version Required for DR4NL) ragent_v3.14.1.11-32.09.03.25.msi 03-25-2009 Beta ragent_v3.14.1.11-32.0.0.0.msi 01-30-2009 ragent_v3.13.1.10-32.08.11.12.msi 2008-11-12 for up to 4 DVRs and 64 Cameras max ragent_v3.13.1.10-32.08.08.08.msi 2008-08-08 for up to 4 DVRs and 64 Cameras max ragent_v2.10.0.9-32.0.0.0.msi 2008-06-12 for 4 DVR and 16 Cameras max ragent_v2.9.0.6-32.0.0.0.msi 2008-05-13 for 4 DVRs and 64 Cameras max Ver 2.5.10.2-32.0.0.0 2007-11-06 Ver 2.4.9.2-32.0.0.0 2007-07-31 Ver 2.4.8.2-32.0.0.0 2007-04-04 |
||||||||||||||||||||||||||||||||||||||||||||||||||||||||||||||||||||||||||||||||||||||||||||||||||||||||||||||||||||||||||||||||||||||||||||||||||||||||||||||||||||||||||||||||||||||||||||||||||||||||||||||||||||||||||||||||||||||||||||||||||||||||||||||||||||||||||||||||||||||||||||||||||||||||||||||||||||||||||||||||||||||||||||||||||||||||||||||||||||
|
Digimaster Storage Calculators Digimaster DR16N2 StorageCalculator.exe 2009/06/17 Digimaster StorageCalculator_CBC_Final_20070228.exe 2007/02/28 NRT StorageCalculator(CBC).exe 2008/05/07 |
||||||||||||||||||||||||||||||||||||||||||||||||||||||||||||||||||||||||||||||||||||||||||||||||||||||||||||||||||||||||||||||||||||||||||||||||||||||||||||||||||||||||||||||||||||||||||||||||||||||||||||||||||||||||||||||||||||||||||||||||||||||||||||||||||||||||||||||||||||||||||||||||||||||||||||||||||||||||||||||||||||||||||||||||||||||||||||||||||||
|
Codec to view video using MS Windows Media Player Download icodec_v1.0.0.10.exe. |
||||||||||||||||||||||||||||||||||||||||||||||||||||||||||||||||||||||||||||||||||||||||||||||||||||||||||||||||||||||||||||||||||||||||||||||||||||||||||||||||||||||||||||||||||||||||||||||||||||||||||||||||||||||||||||||||||||||||||||||||||||||||||||||||||||||||||||||||||||||||||||||||||||||||||||||||||||||||||||||||||||||||||||||||||||||||||||||||||||
|
Backup Player and Codec from Archived CD Backup Player with screen shot 07-30-2010 Codec setup program 01-30-2009 Copies Codec to Windows folder If you are burning downloaded archives from the DVR, you can add these two files to the CD-ROM. |
||||||||||||||||||||||||||||||||||||||||||||||||||||||||||||||||||||||||||||||||||||||||||||||||||||||||||||||||||||||||||||||||||||||||||||||||||||||||||||||||||||||||||||||||||||||||||||||||||||||||||||||||||||||||||||||||||||||||||||||||||||||||||||||||||||||||||||||||||||||||||||||||||||||||||||||||||||||||||||||||||||||||||||||||||||||||||||||||||||
|
Email setup trouble? Try this: I have tested the DR16NRT & DR16N DVR's and the email and is working fine with a Gmail account 1) Create a gmail account ( http://www.google.com/ ) 2) In the DVR: A) Configure Network/email (info from http://mail.google.com/support/bin/answer.py?hl=en&answer=13287 ) User: email Address (i.e. yoursiteDVR@gmail.com) Password: yourpassword Server: smtp.gmail.com Port for SSL: 465 B) Configure Users with email C) Configure Alarm/Alerts / email & set dwell time to 5 min for testing. 3) Check user email. |
||||||||||||||||||||||||||||||||||||||||||||||||||||||||||||||||||||||||||||||||||||||||||||||||||||||||||||||||||||||||||||||||||||||||||||||||||||||||||||||||||||||||||||||||||||||||||||||||||||||||||||||||||||||||||||||||||||||||||||||||||||||||||||||||||||||||||||||||||||||||||||||||||||||||||||||||||||||||||||||||||||||||||||||||||||||||||||||||||||
|
CBC America Digimaster Remote Agent Setup Assumptions: The DSL Router/Switch (Router) has a class C Local Area Network (LAN) address which is either 192.168.1.1 or 192.168.1.254 The Router Internet (WAN) has either a static or dynamic Public address. That is, it does not start with:
10.0.0.0 – 10.255.255.255 (Class A), 127.0.0.0 – 127.255.255.255 (Loop back), 169.254.0.0 - 169.254.255.255 (APIPA - Automatic Private IP Addressing), 172.16.0.0 – 172.31.255.255 (Class B), 192.168.0.0 – 192.168.255.255 (Class C), or 255.255.255.255 (broadcast)
192.168.1.10 to 192.168.1.19 - Servers 192.168.1.20 to 192.168.1.29 - DVR's 192.168.1.30 to 192.168.1.99 - Static IP Devices like printers, fax machines, scanners, and IP cameras 192.168.1.100 to 192.168.1.254 - PC's and dynamic or temporary IP Devices
To find an available IP address, from the black cmd screen, type "ping 192.168.1.20" <Enter> If you get "No reply", then we can assume that address is not used. Otherwise keep trying addresses until you do not get a reply, "ping 192.168.1.21" ...
IP addrees/Domain Name - 192.168.1.20 Port - 6100 User ID - ADMIN Password - 1234 Under DVR setup cameras 1 2 3 4 5 6 7 8 ... Procedure for remote/off-site access
E-mail Address: Password: > 5 characters and cannot be the same as your username. Check "I agree to the AUP:" Check "I will only create one (1) free account" Select "Create Account"
Select "Use auto detected IP address 68.4.180.29." Select "Create Host" Log off the site
Port Start - 6100 Port default - 6100 Port End - 6100 Protocal - Both IP Address - 192.168.1.20 (DVR Address) Enable - Yes
IP addrees/Domain Name - either your static IP Address or your DDNS hostname Port - 6100 User ID - ADMIN Password - 1234 Under DVR add camera 1 2 3 4 5 6 7 8 ... |
||||||||||||||||||||||||||||||||||||||||||||||||||||||||||||||||||||||||||||||||||||||||||||||||||||||||||||||||||||||||||||||||||||||||||||||||||||||||||||||||||||||||||||||||||||||||||||||||||||||||||||||||||||||||||||||||||||||||||||||||||||||||||||||||||||||||||||||||||||||||||||||||||||||||||||||||||||||||||||||||||||||||||||||||||||||||||||||||||||
|
Copy Remote Agent Setup for Backup, to install on multiple PCs', or for easy client install To create a Copy of the Site Setup, you must be using the exact same version of Remote Agent. 1) Download Remote Agent and copy it to a Flash Drive.
* Then go to File/SaveAs and save as CopySite.bat. Close notepad and you are ready to go. |
||||||||||||||||||||||||||||||||||||||||||||||||||||||||||||||||||||||||||||||||||||||||||||||||||||||||||||||||||||||||||||||||||||||||||||||||||||||||||||||||||||||||||||||||||||||||||||||||||||||||||||||||||||||||||||||||||||||||||||||||||||||||||||||||||||||||||||||||||||||||||||||||||||||||||||||||||||||||||||||||||||||||||||||||||||||||||||||||||||
|
Firmware DR4N (old) Black Front - Download iDVR400T3.7.41.1ENCU.img 2007-08-04 DR4N (old) Black Front - Download DR4N_firmware_updater.exe 2007-08-04 To update DR4N (old) firmware
Note: Do Not Install the H/W Version 0.0.0.5 Firmware on a H/W Version 0.0.0.1 DVR!!! Otherwise you will need to send us the DVR to have it re-flashed. If your browser renames the file extension as *.htm, you will need to rename it back.
Digimaster Series Firmware basic update Installation Instructions:
|
||||||||||||||||||||||||||||||||||||||||||||||||||||||||||||||||||||||||||||||||||||||||||||||||||||||||||||||||||||||||||||||||||||||||||||||||||||||||||||||||||||||||||||||||||||||||||||||||||||||||||||||||||||||||||||||||||||||||||||||||||||||||||||||||||||||||||||||||||||||||||||||||||||||||||||||||||||||||||||||||||||||||||||||||||||||||||||||||||||
|
Basic DVR Network Layout This is a design for a simple network. This along with a DVR Setup Documentation Sheet will help you set up your system. 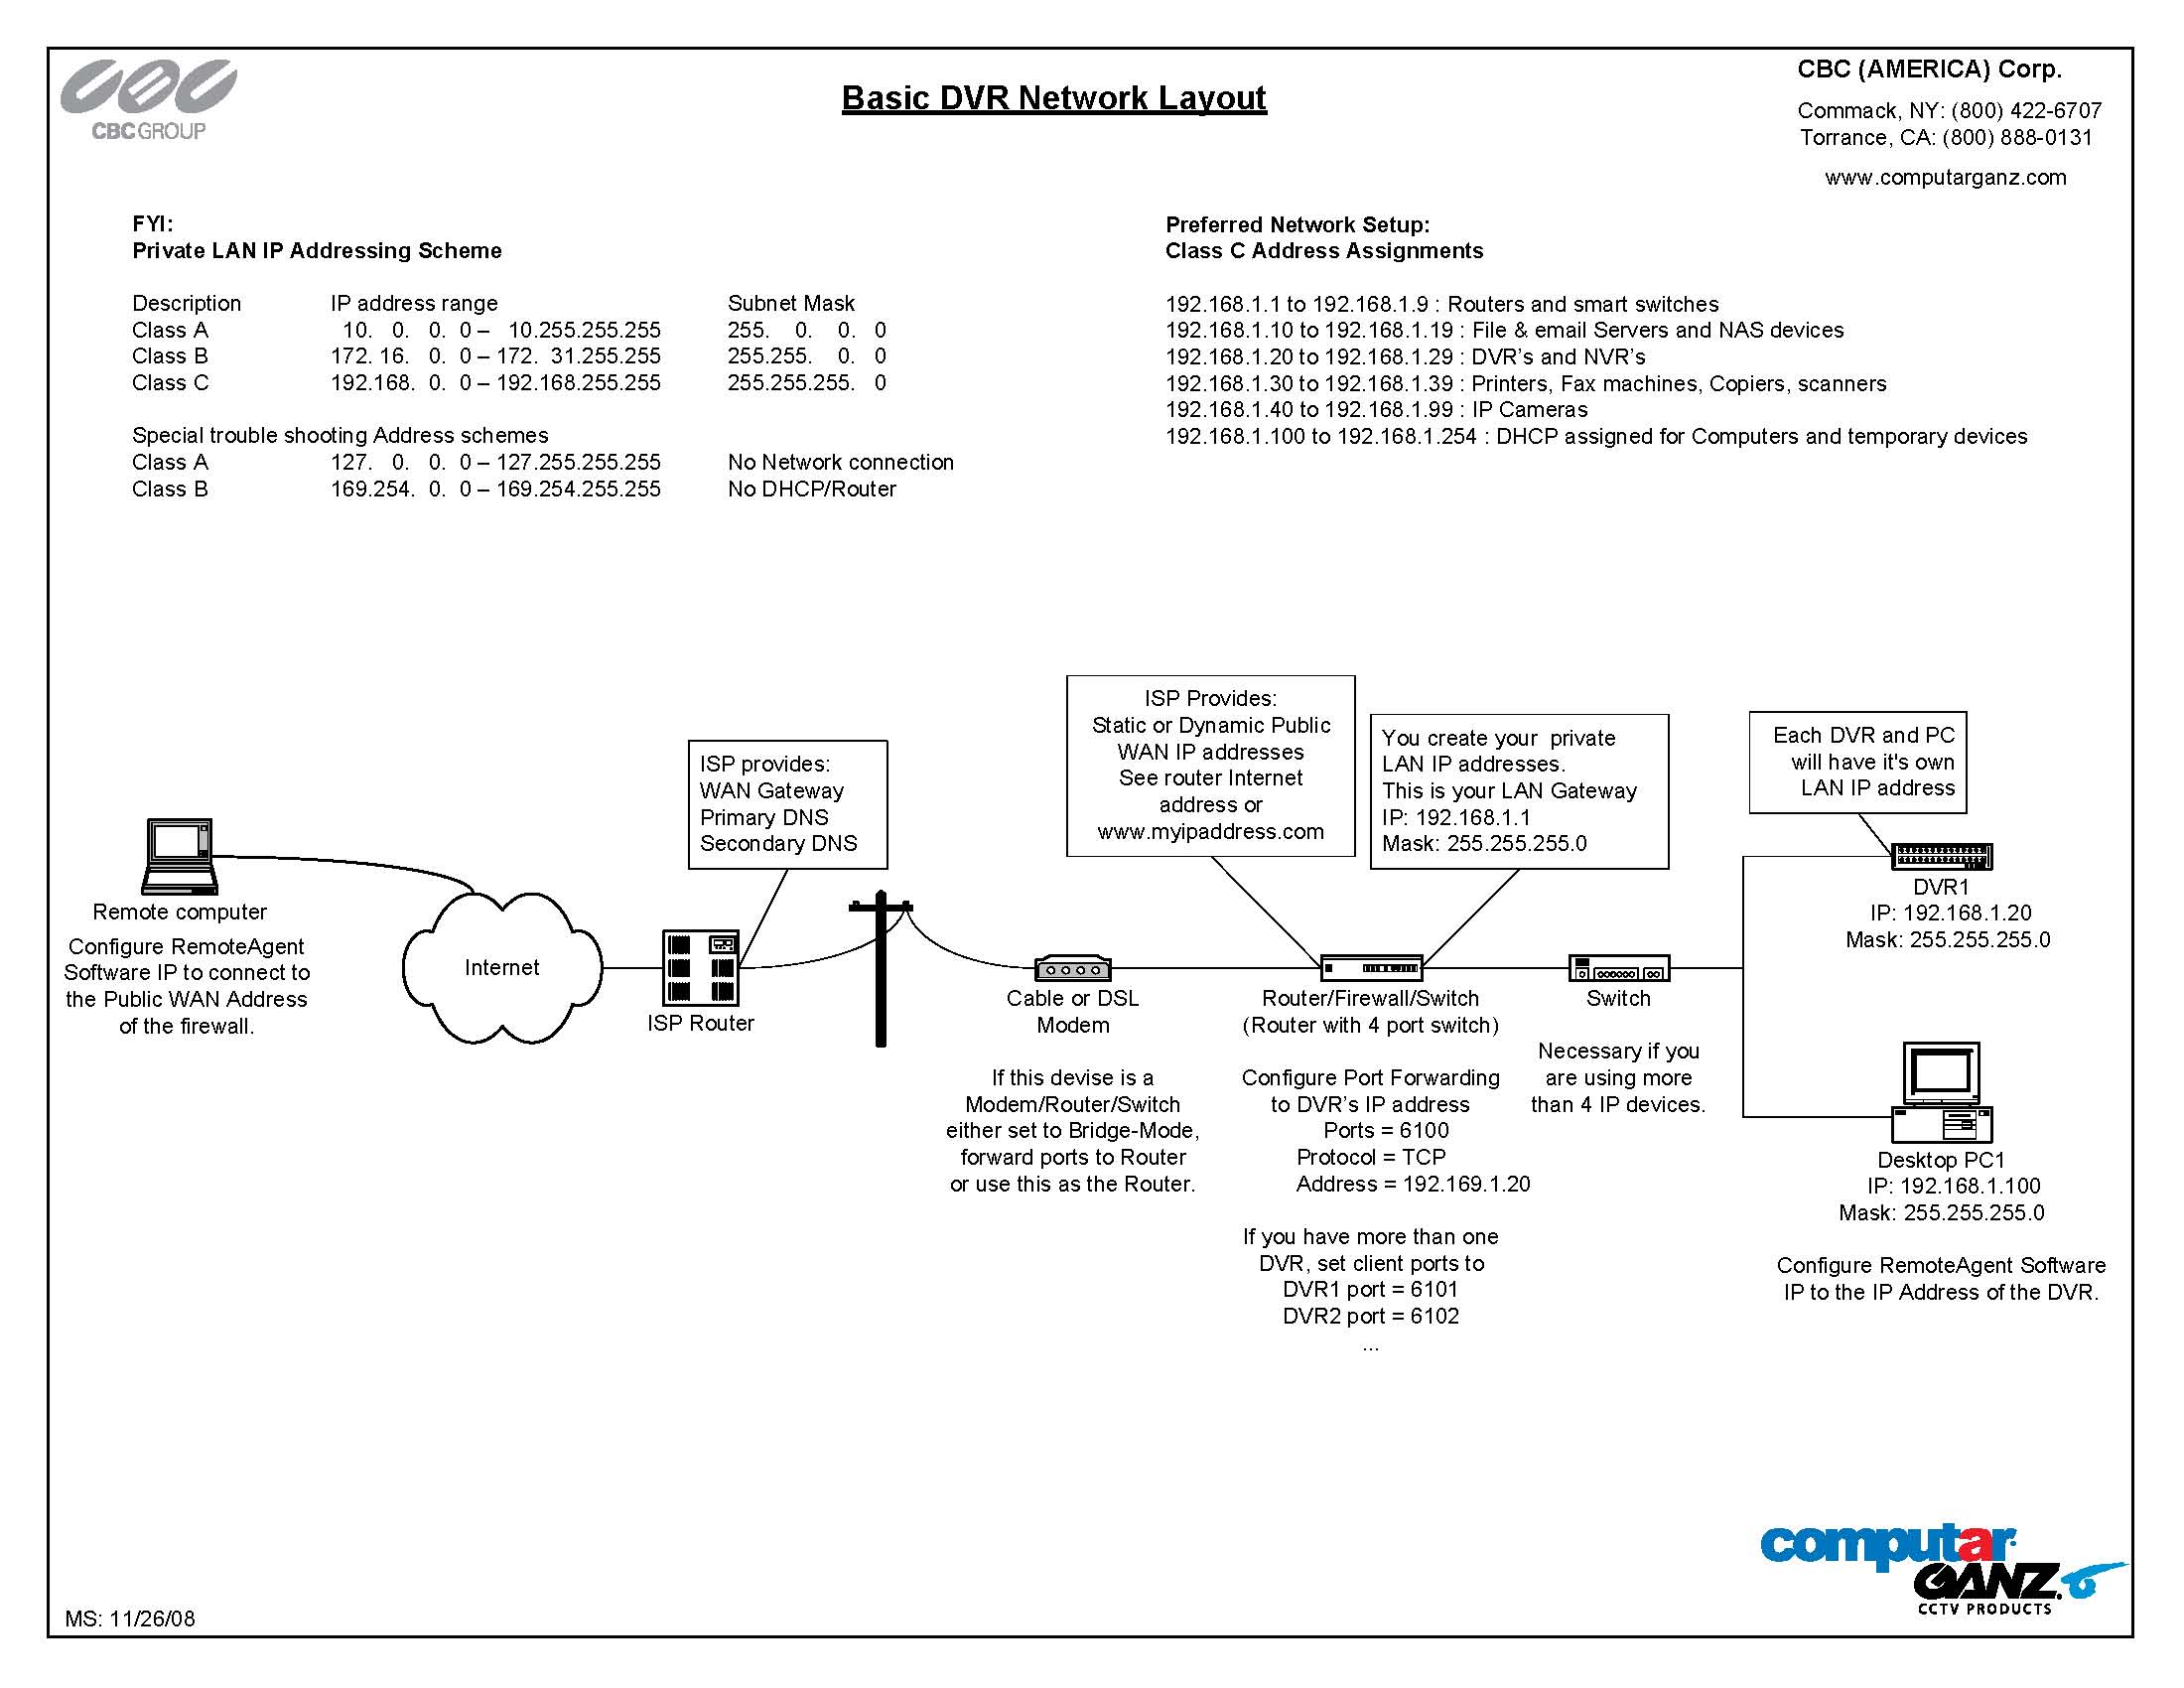 Download Sample Layout BasicDVRNetworkLayout.pdf |
||||||||||||||||||||||||||||||||||||||||||||||||||||||||||||||||||||||||||||||||||||||||||||||||||||||||||||||||||||||||||||||||||||||||||||||||||||||||||||||||||||||||||||||||||||||||||||||||||||||||||||||||||||||||||||||||||||||||||||||||||||||||||||||||||||||||||||||||||||||||||||||||||||||||||||||||||||||||||||||||||||||||||||||||||||||||||||||||||||
|
Configuring DDNS On A Netopia 2200-3300 Series Router Use this to add DDNS on a Netopia router: Download ConfiguringDDNSOnANetopia2200-3300SeriesRouter.pdf |